
Module · Bookings (incl. Experiences, Staff, spaces & equipment, Check-in)
Where to find it in the app
- Use it: Bookings → Bookings
- Turn it on/off: your business name (top-left) → Settings → Modules → Bookings → Bookings
Plan: Solo and Business · Module group: Bookings & schedule · Navigation:
Bookingsand the related pages Experiences, Staff, spaces & equipment and Check-in in the same group.
Bookings is the heart of HappierBiz. It is really four connected screens:
- Experiences, what customers can book (you set this up first).
- Staff, spaces & equipment, the staff, spaces and equipment a booking uses.
- Bookings, the live list of reservations you manage day to day.
- Check-in, the door, on the day.
Your wording. "Booking" is renameable per business, your menus and screens may say appointment, class, party, job or lesson. This manual uses "booking" generically.
A. Experiences, what customers can book
A1. Overview
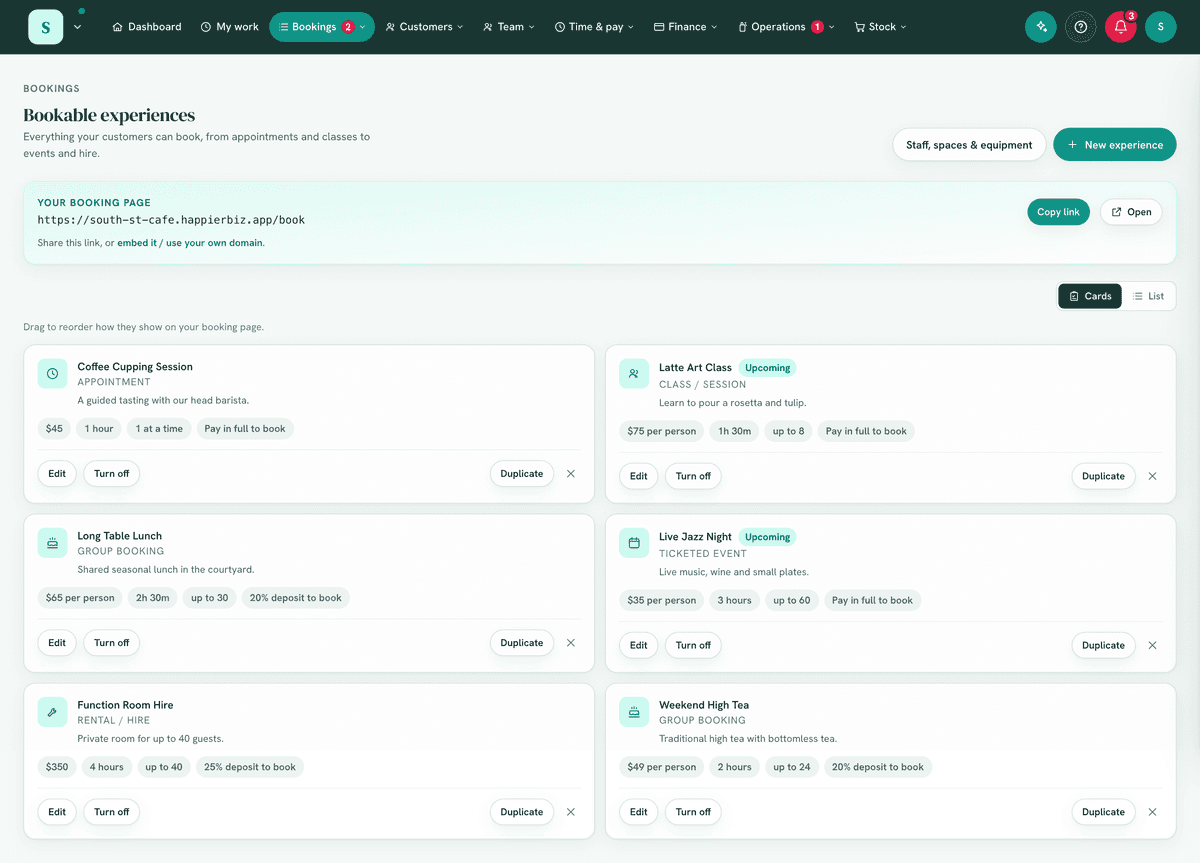
An experience is anything you let a customer book. Each experience has a type that shapes its booking flow and sets smart defaults, while every value stays editable. Set up your experiences before taking online bookings.
The five types:
| Type | For | Examples |
|---|---|---|
| Appointment | One customer books a time with a staff member | Haircut, consult, treatment, tattoo, tutoring, trades quote |
| Class / Session | Many people book seats in a scheduled session | Yoga, gym class, swim lesson, workshop, open play |
| Group booking | One group books the space, with packages & extras | Birthday party, function, venue hire, escape room |
| Ticketed event | People buy tickets to a one-off dated event | Market stall, gig, pop-up, paid course, fundraiser |
| Rental / hire | A customer hires a space or piece of equipment by the hour or day | Equipment, court, studio, boat, meeting room |
A2. Required permissions
- Manage experiences & packages (
experiences.manage).
A3. Navigation path
Bookings → Services
A4. Step-by-step, create an experience
- Go to
Bookings → Servicesand choose Add (or pick a type under "What can people book?"). - Pick the type (Appointment, Class, Group, Event, Rental).
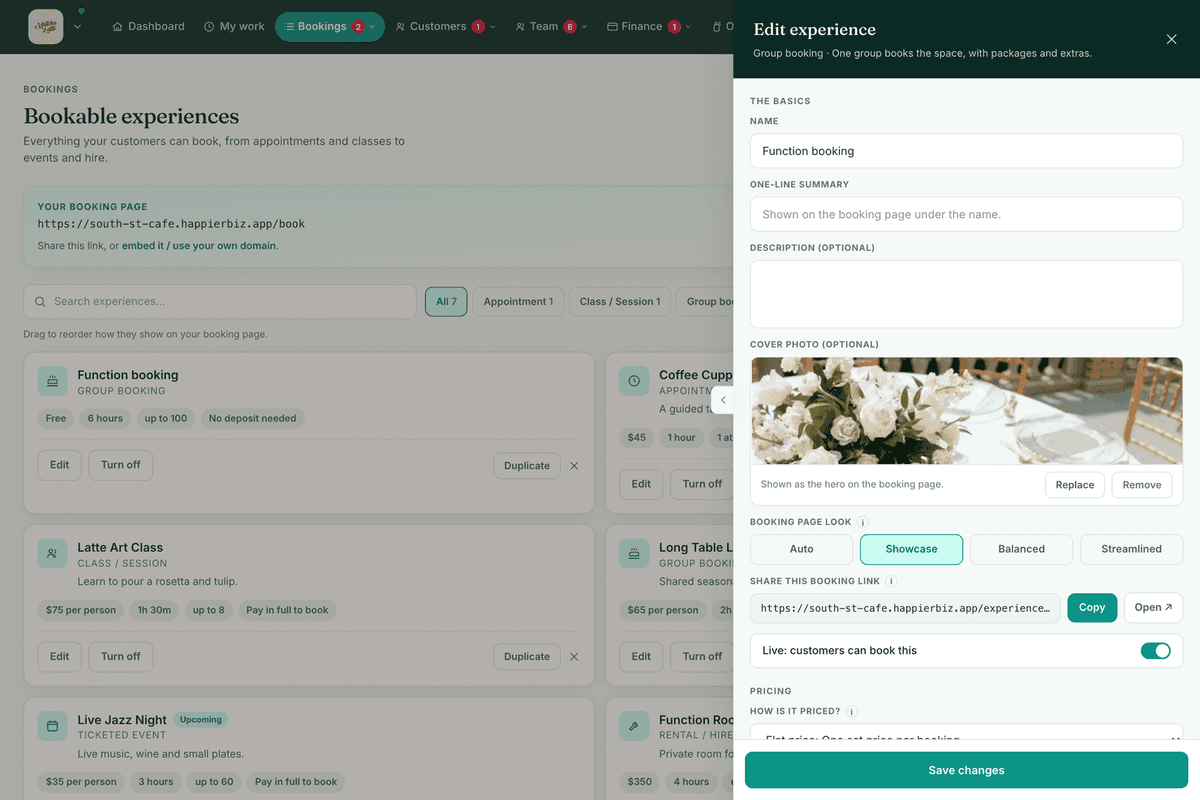
- Fill in The basics: Name, a one-line summary (shown under the name on your booking page), and the Live toggle ("customers can book this").
- Set Pricing, choose a pricing model and enter the price:
- Flat, one price.
- Per person, price × number of people.
- Per unit, price × units (set the unit label, e.g. "hour"), for
rentals. Then say what one unit is:
- A length of time (the default, and what hire by the hour or day means): the customer picks how many, and the booking runs that long and holds the whole window, so nobody can book the middle of it. Three hours on a one-hour duration is a three-hour booking.
- A thing they take (3 kayaks): the price multiplies but the booking keeps its normal length. Customers choose the number before picking a time, so the times offered are only the ones the whole hire fits into.
- Package, offer selectable packages (each with a name, blurb, inclusions list, price and its own duration).
- For events/classes you can add ticket types (e.g. Adult, Child) with their own prices, these are named ticket categories on top of (or instead of) the per-person price.
- Per-staff pricing (optional), override the price for specific staff members (e.g. a senior stylist charges more for the same service).
- How the price reads (optional), your own wording for the price on your
booking page. Leave it blank and we write it from your numbers, so a party
package at $350 covering 8 with $12 a head after that reads "from $350
(incl. 8)". Type your own to say it your way, and Customers will see
right underneath shows exactly what they will read as you type. Tap one of
the Or try suggestions to take a ready-made wording, or use ours to
go back to the automatic one.
- This is wording only. It never changes what anyone is charged, and it never changes the total on the booking page, the payment, the invoice or the confirmation.
- The word "from" only appears when a booking really can come to more than the number shown, which means a package that charges for extra people, several packages or ticket types to pick between, or a service that costs more with certain staff. A single flat price is never "from".
- If your wording hides the fact the price can go up, we say so under the box, with what a bigger group would actually pay. It is a heads-up, not a block, and it is only for you: your customers never see it.
- Class passes (classes), sell a multi-session bundle up front: a flexible pass (buy N credits to use on any session until expiry) or a term enrolment (a held seat in specific weekly sessions), with your choice of missed-session policy (forfeit, make-up, refund, or reviewed case-by-case). Passes appear on your booking page alongside single sessions; sold passes are managed from the admin Passes view.
- Set Time & capacity: duration, capacity, and, depending on type,
class times (recurring days + time) or event dates (one-off
occurrences). On your public booking page, scheduled types (class/event)
show only your real upcoming dates as tappable chips, while rolling types
(appointment, group, rental) use an open calendar.
- Waitlist, for scheduled types, when a session is full customers can join the waitlist; if a spot frees up, the next person in the queue is emailed.
- Capacity is never applied behind the customer's back. If somebody types more people than you can take, the booking page tells them the number you can take and asks them to get in touch, and it holds their booking there until they change it. It does not quietly book them in for fewer. So a party of thirty asking about a room for twenty five reaches you as a phone call, instead of arriving on the day as a booking for twenty five.
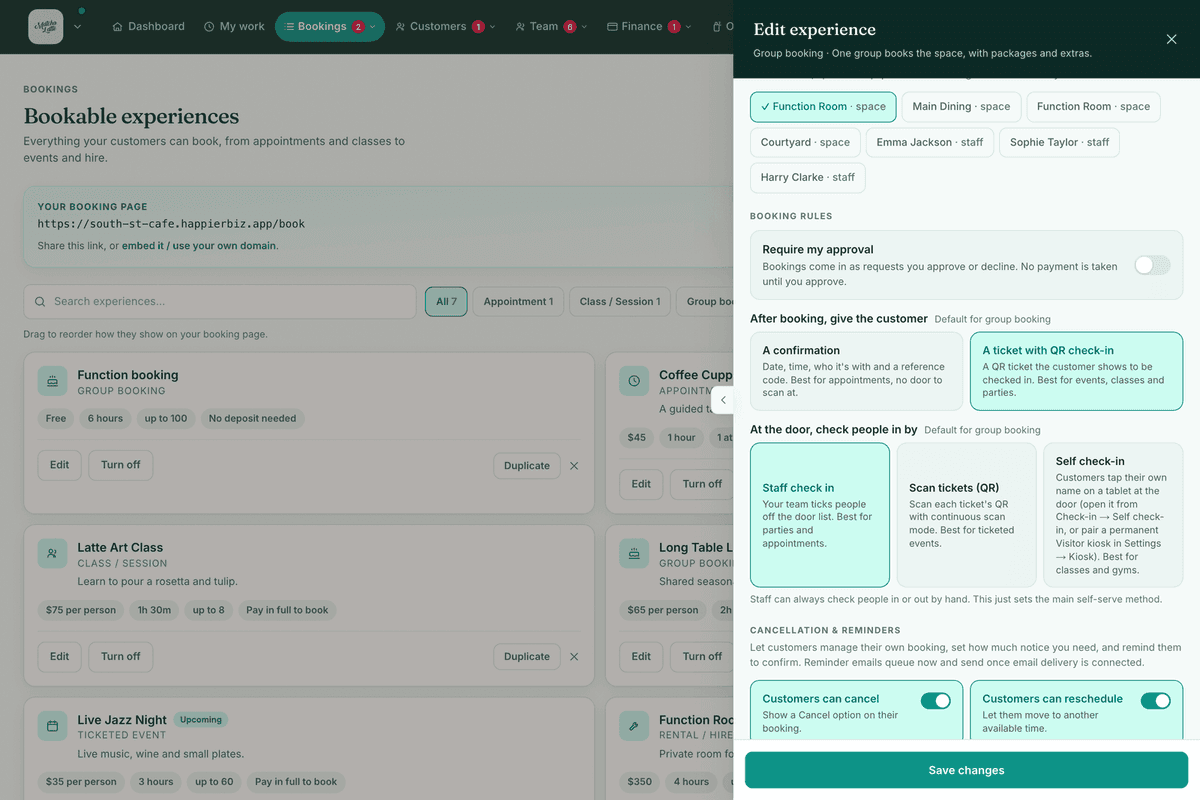
- What it uses, attach the spaces & equipment this experience needs (a staff member, a room, equipment). This drives availability.
- Booking rules:
- Delivery, what the customer gets after booking: A confirmation (date, time, who, a code, best for appointments/rentals) or A ticket with QR check-in (best for events, classes, parties). For ticketed experiences you can also control Individual tickets: every attendee gets their own QR ticket, so a group can arrive separately and each person is scanned in on their own. Events default to one separate ticket per guest, while groups and parties default to one shared group ticket, and you can adjust this per experience.
- Check-in, how people are checked in at the door: Staff check in,
Scan tickets (QR) or Self check-in kiosk. Each shows a "Default for
" hint until you override it.
- Cancellation & reminders: let customers cancel and/or reschedule themselves, set a late-change penalty, and switch on a reminder + confirm message.
- Booking questions (optional), add your own questions (e.g. "Allergies &
dietary needs", "Preferred stylist"), each required or optional. Pick the
answer type: a Text box, a Dropdown, Choose one, or Pick many.
- Pick many also asks "How many can they pick?", so a package that covers three items off your food list can say so: Any number, Exactly, Up to, or At least, with the number beside it. The customer sees the rule next to the question ("Party food (choose 3)"), a running count as they tick, and the remaining options grey out once they reach the limit.
- If you ask for more than you have listed, the builder warns you and the booking page falls back to the number of options you do have, so a customer is never stuck on a rule nobody can satisfy.
- Put a price on these options turns a Pick many into a paid menu: each option gets its own price, and "How many are included in the price?" says how many the headline price already covers. The dearest picks are the free ones, so choosing the better platter is never punished, and only what's past the allowance is charged. This is the party-package shape: nine platters listed with prices, three included, a fourth costs. The customer sees each price on the option, a running line telling them what they've used and what the basket adds, and an itemised line on Review.
- Let them add their own puts an extra choice on a Choose one or Pick many, with a box to type in, for the customer who wants something that isn't on your list. You word that choice yourself, so it can say Other, Something else, or Tell us what you need. What they type is never charged, even if they type the name of one of your priced options, and it fills one slot toward any limit you set, so "choose 3" still means three things altogether. Their wording is stored with that label in front of it (Other: dinosaurs), so you can always tell which answers came off your list and which came from the customer. Off unless you ask for it.
- Add a note for customers puts a line or two of your own wording under the question and above the answer, for the part that won't fit in the question itself: "Each platter feeds 8 to 10 adults. Three come with the party." Line breaks are kept, so three sizes typed on three lines show as three lines. Off unless you ask for it, and an empty one shows nothing.
- If a question asks for something the form already collects, the builder says so. Every booking asks for a name, an email and a phone number under Their name, email and phone, so a question called "Mobile number" means the customer types theirs twice. It is only a warning, never a block: asking for a second contact, an emergency number or the name of whoever is paying is a real thing to want, and only you know which you meant.
- Use the ↑ ↓ on a question to move it. You no longer have to delete a question and retype it just to change where it sits.
- Start a new section here puts a heading above a question and a dividing line before it, so everything from there reads as a new part of the form. This is how you group a long booking form: move the questions into the order you want with ↑ ↓, then title the group. A play centre moves its food questions together, puts Food on the first of them and its paid platters straight after, and a parent reads one food section instead of meeting platters, then a theme, then platters again. Off unless you ask for it, and a heading on the very first question draws no line, because the section above it has already drawn one.
- Order of the booking form, the running order a customer fills in:
Tickets, How many people, Their name, email and phone, Your own
questions, Paid extras. Move any of them with ↑ ↓ so the form reads
the way you'd ask it at the counter. Blocks that don't apply to that
offering are skipped on the booking page, so it is safe to leave them in
place. You can move every block; you can't remove one, because there is no
running order worth having that leaves you unable to email the customer
back. The date and time always come first, on the step before, since
online the first question is whether you're free at all.
- Each block also has Give this part your own heading and Add a note above "…", so you can title and introduce a part of the form in your own words: a heading of Platters to share over the paid extras with a note of "Each one feeds 8 to 10 adults, on top of the three that come with your party", or "Count every child coming, including the birthday child" above the headcount. Both travel with the block, so moving it takes your wording with it.
- Your heading sits above the built-in line, it does not replace it, so Add extras (optional) and Your details (all required) still say optional and required. A customer who loses that is one who thinks the paid extras are compulsory.
- On the booking page each block is separated by a thin line, so a long form reads as a few parts rather than one long list of fields.
- Payment to book, take a deposit or full payment at booking; the deposit can be a fixed amount or a percentage.
- Optional extras (add-ons), named extras with a price. Tap the charge
button to cycle how each one is charged: Per booking (one flat charge),
Per person (price × headcount), or They choose how many (price ×
the number they ask for, e.g. party bags at $7.70 each, with a ceiling you
set). The three are exclusive on purpose: per-person and a quantity
together would charge headcount times quantity, which nobody means.
- Add a note under the name describes what is actually on it, so the name stays short on the booking page and on the invoice. Put "Sweets Platter" in the name and "Cupcakes, slice, chocolates and lollies" in the note, rather than cramming both into the name.
- The customer sees the unit beside the name and the line total on the right, so party bags at $7.70 each for eight guests read $7.70 × 8 and $61.60.
- Terms (optional), terms the customer agrees to.
- Use the Availability preview to sanity-check open times, then Save.
A4b. Faster, paste your whole price list and let AI set it up
You do not have to build each one by hand. On the "What can people book?" screen there is a box headed "Describe what you offer and we'll set it up". Type or paste your price list in plain English, however you would say it to a new staff member, and HappierBiz drafts the lot for you to check.
It reads and sets up, in one go:
- Several offerings at once (up to 12), one per thing you named. Price variants that are really separate bookings, small dog vs large dog, 30 min vs 60 min, come out as separate offerings.
- Prices, including Adult / Child / Concession ticket types on a class or event, and named packages on a group booking.
- Times, the set start times you offer ("we only start these at 9, 11, 1 and 3"), a class timetable ("Tue and Thu 6pm, Sat 10am"), and an event's dates.
- Paid extras ("+ $15 nail trim, $20 teeth clean") on the offering you described them against.
- Deposits, notice periods, approval, cancellation terms and the questions you want asked at booking.
Then you get a review list showing exactly what it read, with the times, extras and deposits spelled out on each row. Untick anything you do not want and press Save. They are saved turned off so you can check the detail first, unless you tick "Put them straight on my booking page". Nothing is saved until you press Save, and you can open any of them afterwards and fine-tune.
If your list is longer than it can read in one go, it says so and asks you to send it in two goes, rather than quietly setting up only part of it. It never invents a price, time or capacity you did not give: anything missing is called out in the note at the top of the review list, so you know what still needs your attention.
Drafting uses your business's shared monthly AI allowance (see AI assistant).
A5. Examples
- Beginner (salon): an Appointment called "Cut & style", flat $55, 45 min, attached to the stylists, confirmation delivery, staff check-in.
- Real-world (venue): a Group booking "Kids' party" with two packages (Standard/Deluxe), a $110 deposit, an add-on "Extra pizza /person", a booking question "Allergies", and a QR ticket + staff check-in.
- Advanced (studio): a Class "Yoga" with recurring class times (Mon & Wed 9:30), Adult/Concession ticket types, full payment to book, and a kiosk for self check-in.
A6. Where it happens: your place, theirs, or online
Three switches, and they answer different questions. Confusing them is the usual mistake, so read all three.
1. "Do customers come to you?" (Settings → General, business-wide)
This decides whether your address is published to customers at all. With it on, your address, a map and a get-directions link appear on booking emails, the confirm page and the manage page. Turn it off and all of that disappears, which is what you want if you work from home, or only ever travel to people.
Your phone number is never hidden by this switch. A business that comes to you is exactly the one whose customer most needs a number to ring.
Your address still appears in the small print at the bottom of emails whatever you choose. Anti-spam law requires a real postal address on commercial email, and that is not something a setting can turn off.
2. "We come to the customer" (Experiences → the offering → Where it happens)
This is per offering, not per business, and it says that this particular thing happens at the customer's place. Turn it on and:
- the booking form asks for the address to come to, plus an optional note about getting in (a gate code, a dog in the yard, where to park);
- every message about that booking says "We come to you" with their address, and never sends them directions to your shop;
- the Add to calendar entry is pinned to their address, not yours;
- the address and the access note are carried onto the job and the customer's site, so whoever is driving there has both on their phone.
Both can be true at once, and that is the point: a groomer can run a salon and a mobile round, a physio can consult in clinic and visit. Each booking then says the right thing without anyone remembering to check.
3. "This happens online" (Experiences → the offering → Where it happens)
This one is not switched on for most businesses, and the toggle does not appear unless it is. Video calls run on an account HappierBiz pays for, so having it is a conversation rather than a setting. Ask if you want it.
Where you do have it, the appointment happens over video and there is no address involved. Turn it on and:
- every booking gets its own private room, created automatically;
- a Join the call link appears in the confirmation and the reminder;
- the same call appears on the booking in your back office, so you never hunt for a link or send one by hand;
- nobody installs anything and neither of you needs an account.
The link is a door, not a key. It points back at your own booking page rather than straight at the video service, and the booking is re-checked at the moment somebody clicks it. That is what makes all of the following true:
| Nobody can arrive early | The room opens ten minutes before the start and closes two hours after. Click outside that and the page says when to come back |
| Cancelling really cancels | Cancel or decline the booking and the link stops working immediately, even for somebody holding the email |
| You hold the controls | Your customer joins as a guest. They cannot put a password on the room, remove anyone, or lock you out of your own call |
| A forwarded link ages out | Each visit issues a pass good for a few hours, not a permanent address |
Your customer sees your business name on the join screen and their name already filled in. You get the same room with your own name on it.
Why the address is its own field and not a booking question. Custom booking questions are stored together as one note, and the door screen reads that note as an allergy alert. An address asked as a question would show up at check-in as a dietary warning. Ask for it with this switch, never with a question.
A word on the address itself. We deliberately accept almost anything with a space in it, because Australian addresses include lot numbers, unnumbered rural properties and places people describe by name. A validator strict enough to be worth having would refuse a real customer at the last step of a booking, which costs far more than an untidy entry you can ring about.
B. Staff, spaces & equipment (staff, spaces & equipment)
B1. Overview
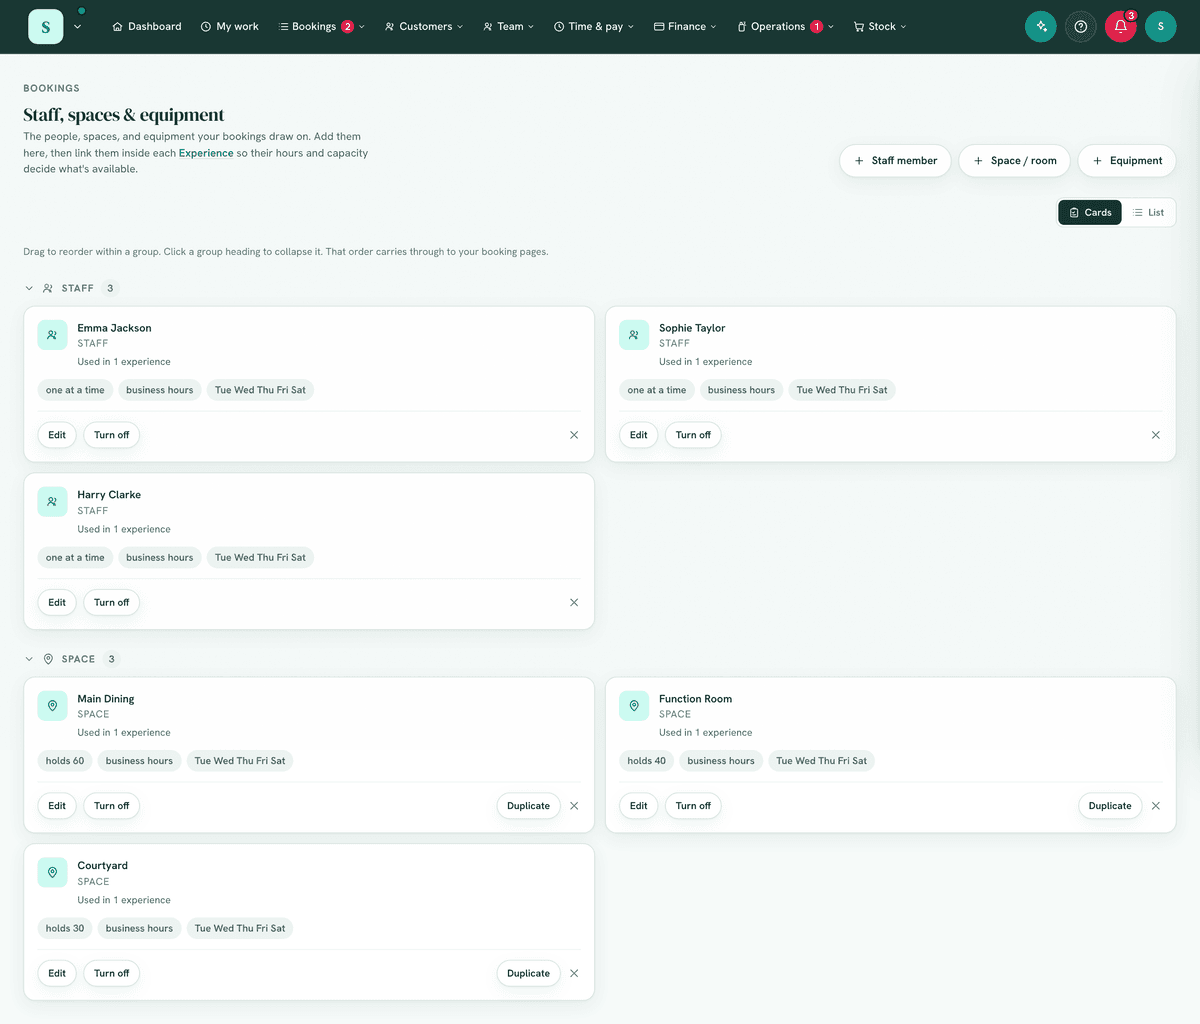
Staff, spaces & equipment are the bookable things an experience consumes, staff, spaces (rooms/areas) and equipment. They control availability and prevent double-booking.
B2. Required permissions
- Manage spaces & equipment (
resources.manage).
B3. Navigation path
Bookings, then Staff, spaces & equipment
B4. Step-by-step, add a space, staff member or piece of equipment
- Choose the kind to add: staff, space or equipment.
- For staff, pick the team member (add them in Team → Staff list first); optionally give them a colour. A staff entry linked to a team member can take its availability from the roster.
- For space/equipment, give it a name (e.g. Party room, Kayak #3).
- Set capacity and the capacity mode (e.g. people, or simultaneous bookings).
- Set Hours, leave Custom hours off to use your venue's opening hours, or turn it on to give it its own hours.
- Set Active (available for bookings) and Save.
B5. Example
A gym adds two staff trainers (roster-driven) and one space "Studio A" (capacity 12). A class experience attached to Studio A can't be over-booked past 12.
C. Bookings, the live list
C1. Overview
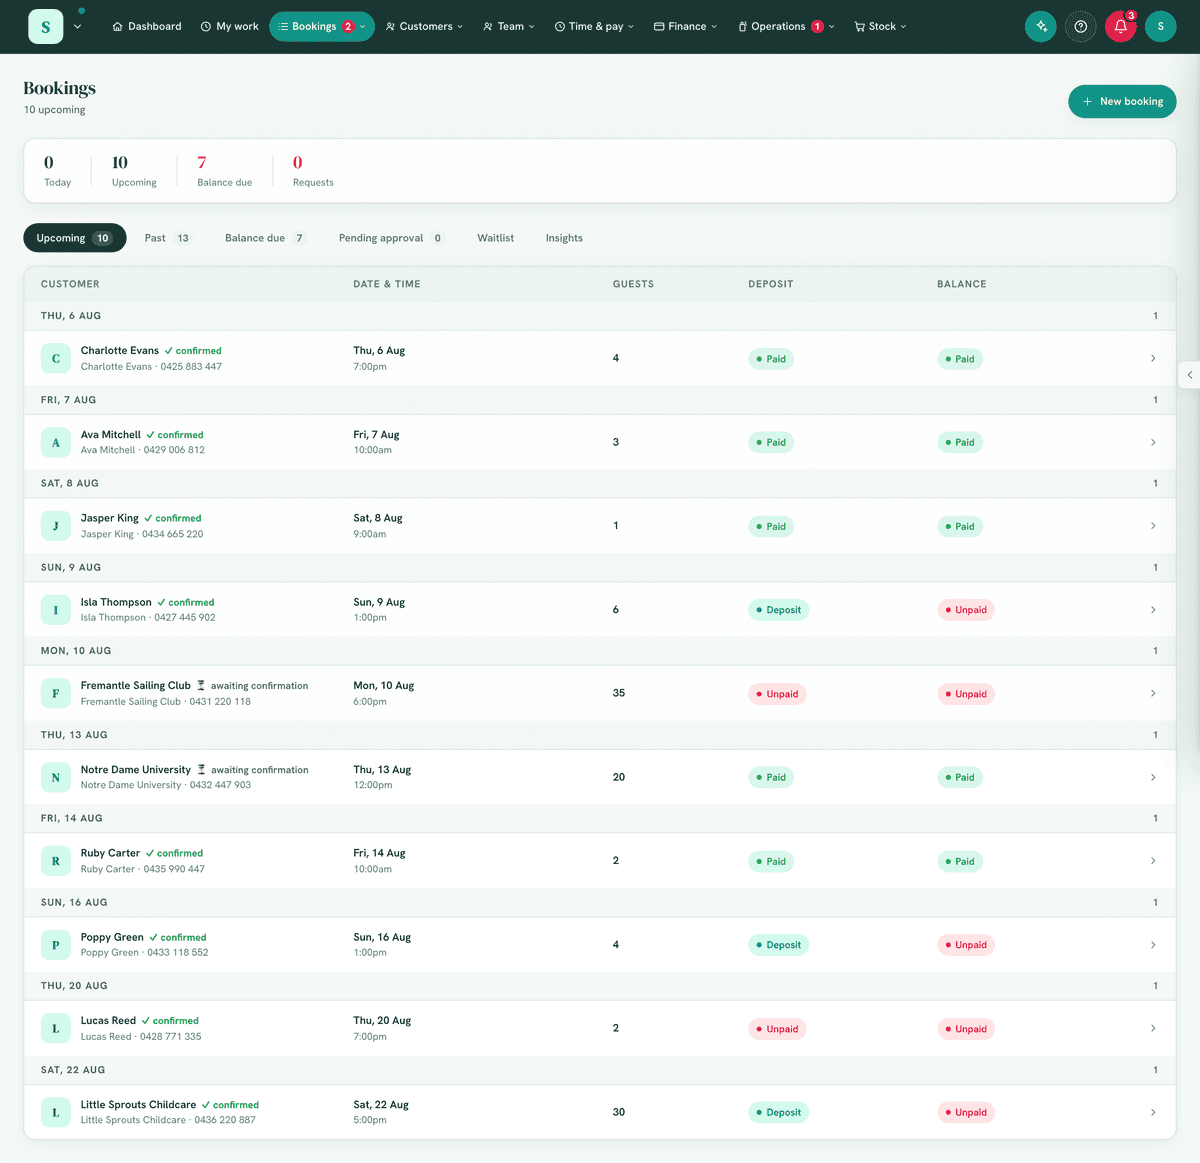
The Bookings screen is your working diary: every upcoming reservation, who owes money, your history, and incoming requests to approve.
C2. Required permissions
- View bookings (
bookings.view) to see it; Create bookings (bookings.create), Edit bookings (bookings.edit), Delete / cancel bookings (bookings.delete) and Approve booking requests (bookings.approve) for the corresponding actions. Marking a balance paid uses Take / charge payments (payments.charge).
C3. Navigation path
Bookings
C4. What you'll see
- A summary band: Today, Upcoming, Balance due, Requests, and a Next booking chip.
- Six tabs:
- Upcoming, an agenda grouped by day (reads like a diary even at 30+/day).
- Past, searchable history (by name, phone or email, with a date range), loaded a page at a time. Tick Show cancelled to include cancellations, each marked with a Cancelled tag. The tick box says how many there are.
- Balance due, everyone who owes, oldest first.
- Pending approval, incoming approval requests and custom enquiries.
- Waitlist shows the join-the-queue waitlist for full sessions, where you see who's waiting and manage the queue.
- Insights shows booking trends and figures (visible when the payments/money module is on).
- A New booking button.
- Each row shows the customer, date & time, party size (your attendee word), and Deposit / Balance pills (Paid / Deposit / Pending / Unpaid). A ✓ confirmed flag shows when the customer has confirmed, and ⏳ awaiting confirmation when they were asked and have not replied. Once the booking's start time goes by, that flips to a quiet didn't confirm, because there is no longer anything to chase. A booking recorded as a no-show carries a red No-show tag instead.
Chasing a confirmation
Open the booking and look at Status → Coming. It tells you where the confirmation stands, in plain words: Not asked yet, Asked 3 hours ago, no reply yet, or ✓ Confirmed 2 days ago.
- Before anyone has been asked, it also says when the automatic reminder is due, for example "The automatic reminder goes out Wed, 19 August 2026", which is the lead time set on that offering under Cancellation & reminders.
- Ask them to confirm sends that reminder now instead of waiting. ⚠️ It is the same email, so the automatic one will not then go out as well.
- Send another reminder appears once they have been asked and have not replied. It sends the same email again, with the same one-tap confirm link.
- There is a short pause between sends, so a double tap cannot email somebody twice. The line above the button always says when they were last asked.
- Once the start time has passed, the button goes away and the line reads Asked 2 days ago, they never replied. Asking someone to confirm an appointment that has already started reads as a mistake, so we do not offer it.
Recording who turned up
Once a booking's start time has passed, its drawer grows a Turned up card with two buttons: They came and No-show. It writes the same record as the Check-in screen, so use whichever is closer to hand, and either mark can be corrected in one tap (the opposite button stays).
- Marking a no-show applies your late-cancellation policy, exactly as it does at the door: if your policy charges a set fee, you are told the amount before anything happens, and only then is the saved card charged or a payment link emailed. Undoing the mark does not undo the money.
- These marks are what feed the No-shows figure in Insights. A booking nobody marks either way is counted in neither direction, and Insights says how many were left unmarked.
- You need check-in access to record it (the same permission as the Check-in screen). Without it the card only shows what was recorded.
- When it cannot be sent, the reason is printed instead of the button: the booking is cancelled, it has already been and gone, it still needs approving, or there is no email address on it.
Nothing happens to a booking that is never confirmed. It keeps its place in the diary, on the run sheet and on the day's lists. Confirming is how the customer tells you they are coming, not a condition of the booking existing, so an unconfirmed booking is a prompt to chase rather than a booking at risk. The only thing that releases a slot on its own is money: an abandoned checkout, or a deposit deadline you have set (see the deposit deadline section).
C5. Step-by-step tasks
Create a booking (staff-made):
- Select New booking.
- Choose the experience/customer, date and time, party size and contact details.
- Save. It appears under Upcoming.
Open & manage a booking: Select any row to open the detail drawer, which shows Payment, booking details (name, contact, attendee count, theme, allergies/notes), and status. From here you can:
- Take a payment, if you can charge payments and anything is owing. This is
how you record money handed over in person, and you can do it as many times as
it takes:
- How much is pre-filled with what is still owing, and you can change it. Take a deposit now and the rest later, or three instalments on a big job.
- How they paid is your own list of methods.
- When it arrived defaults to today and can be back-dated, so cash taken on Tuesday and entered on Thursday still lands in Tuesday's books. It cannot be a future date.
- Note is free text, for a cheque number or a bank reference. Each payment emails the customer a receipt saying what they paid and what is still to come, and the Payment card keeps the running list. ⚠️ It records a payment you have already taken. It does not charge anyone's card, so it works with no saved card and no internet at the counter. ⚠️ You cannot record more than is owing. If you take too much, record the correct amount and refund the difference.
- Change what's booked, when a customer rings to change their numbers or add
something. Set the new head count, tick or untick the extras, and save.
- The price is worked out again from the offering, and the outstanding balance follows, so an automatic balance charge takes the new figure and not the old one.
- Going down is safe. If the new total is less than what has already been paid, nothing is charged and the app tells you the amount you owe back, so a reduction cannot leave a refund nobody noticed.
- The customer is emailed the new numbers, the new total, what they have already paid and what is left, including the day the rest comes off their card where that applies.
- Once it is paid in full it stops offering to change it, and says so: anything added after final payment belongs on its own invoice. Same for a cancelled booking, and for a ticketed offering, where the price comes from the ticket types.
- Needs Edit bookings.
- Reschedule, pick a new date; for experience-based bookings you choose from available time slots, otherwise enter a time. The customer is emailed the new time, told in words if they are now with somebody else, and given a one-tap link to put the new time in their calendar (with a reminder to delete the old entry, since we cannot change an entry already in their phone). Their confirmation tick clears and the reminder is re-armed for the new time.
- Cancel booking, with an optional reason; the slot is freed and the customer notified, including a note to delete the calendar entry if they saved one.
- Invitations, if invitations are on, manage the booking's invite/RSVP from here (see the Invitations & day plan module).
Approve a request:
- Open the Pending approval tab.
- For each pending item, choose Approve or Decline. The customer is notified; approved experience-bookings become live, and approved enquiries can be sent a deposit link.
If an approved deposit is never paid. By default nothing happens: the booking keeps its time until somebody cancels it by hand. To put a deadline on it, open Settings, find the Bookings card, and under Unpaid deposits choose how many days the customer gets. The clock starts when the payment link is emailed, not when the booking was made, so a booking you never asked to pay is never affected. Before the deadline we send one reminder; if it passes we cancel the booking, put the time back on sale, tell the customer plainly that nothing was charged, and let you and anyone on the waitlist know. Changing this only affects bookings approved from that point on, never ones already in the diary. While a deadline is running, the booking's Payment panel shows the date it expires.
Find a past booking:
- Open the Past tab.
- Type a name, phone or email and/or set a From/To date range.
- To include ones that were cancelled or declined, tick Show cancelled. They appear with a Cancelled tag, including any whose date has not passed yet, because a cancellation is history whenever it was booked for.
- Use Load more to page through results.
C6. Examples
- Beginner: take a phone booking with New booking, then Take a payment for whatever they hand over. If that is only the deposit, record just the deposit; the rest stays owing and shows in Balance due.
- Big job paid in instalments: for something like a large renovation, raise an invoice for it (Finance → Invoicing) and record each instalment against that. You get proper progress claims, credit notes, overdue chasing and a tax invoice the customer can pay online.
- Real-world: each morning, work the Balance due tab oldest-first to chase outstanding balances before the booking date.
- Advanced: a customer asks to move their function, open the booking, Reschedule to a date with open slots; the system frees the old slot, re-checks availability and notifies them.
D. Check-in, the door, on the day
D1. Overview
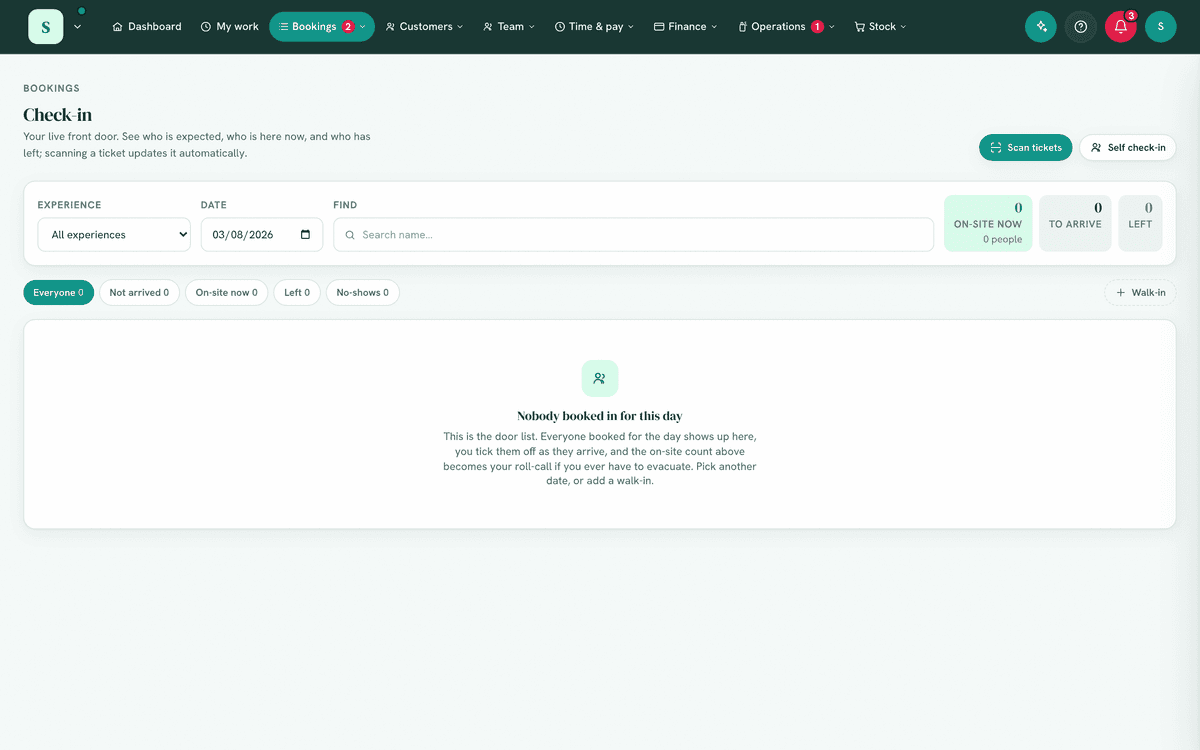
Check-in is the live door list for today (and other days). It tracks each arrival through three states, Expected → On-site → Left, plus No-show for someone who never turned up, and offers faster modes for busy doors: a continuous QR scanner and a self-service kiosk.
Arrival times on this screen are shown on your business's clock, whatever timezone the device you are reading it on happens to be in.
Privacy note (set by your business). HappierBiz deliberately does not record who collects a child; if you need to note something, use the free-text notes. The kiosk shows only first name + last initial for privacy.
D2. Required permissions
- Use day-of check-in (
checkin.use).
D3. Navigation path
Bookings → Check-in (with Scan tickets and Self check-in buttons in
its header).
D4. What you'll see
- A search box, an experience selector (including All experiences), and filter chips: Everyone, Not arrived, On-site now, Left, No-shows.
- A live list of attendees, each with Check in / Check out / Undo controls, a No-show button before they arrive, an allergy or flag badge where relevant, and, once they are on site, a headcount stepper for recording how many of the party actually came in.
- A summary of on-site now (with the live head count), to arrive, and left.
- A walk-in form to add someone who turns up without a booking: their name, what they are here for, and how many people.
- The list refreshes automatically so multiple staff can work the door together.
- If your business requires a waiver (set the text in Settings → Check-in), anyone whose waiver isn't recorded as signed shows a flag at the door. It's a prompt, not a block, staff can tick it off or check them in anyway.
D5. Step-by-step
Staff check-in (default):
- Open
Bookings → Check-in. Pick the experience or All experiences. - As people arrive, select Check in on their row (they move to On-site).
- Adjust the headcount if the number differs from the booking.
- When they leave, select Check out. Use Undo to correct a mistake.
- For someone with no booking, use Walk-in: type their name, choose what they are here for, and set how many people. They are added as arrived, counted on the door, and saved as a customer.
- If someone never turns up, select No-show. If your late-cancellation policy charges a set fee, the app tells you the amount and whether their card will be debited before you confirm.
Scan mode (ticketed events):
- From Check-in, choose Scan tickets.
- Allow camera access. Point the camera at each ticket's QR, valid tickets check in automatically (with a beep), with duplicate-scan protection and a running session count.
- If the camera will not play, or a ticket is too damaged to scan, choose Won't scan? Type the reference and enter the reference from their ticket, email or text. The result is the same as a scan.
Kiosk mode (classes/gyms):
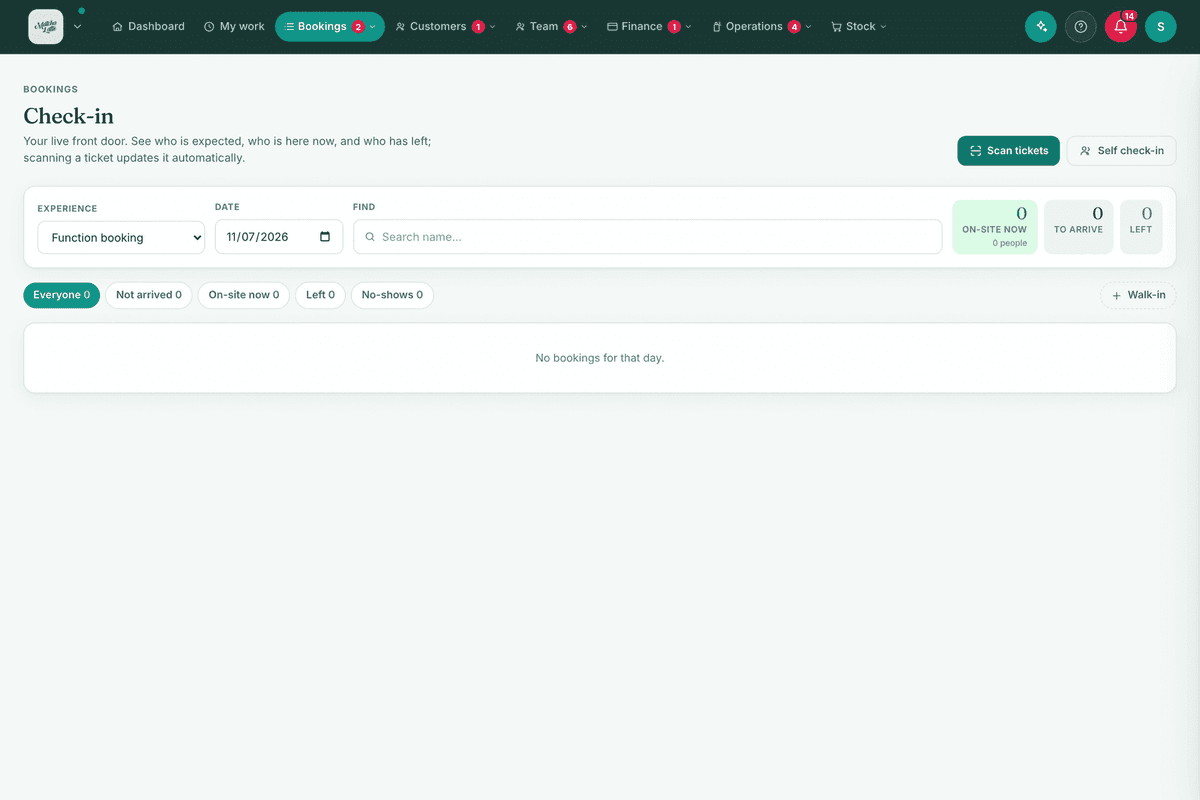
- From Check-in, choose Self check-in and set it on a tablet at the door.
- Customers tap their own name to check in; a full-screen success message confirms. The kiosk shows expected arrivals only, with privacy-safe names.
- Choose Exit kiosk (staff) to leave kiosk mode.
D6. Examples
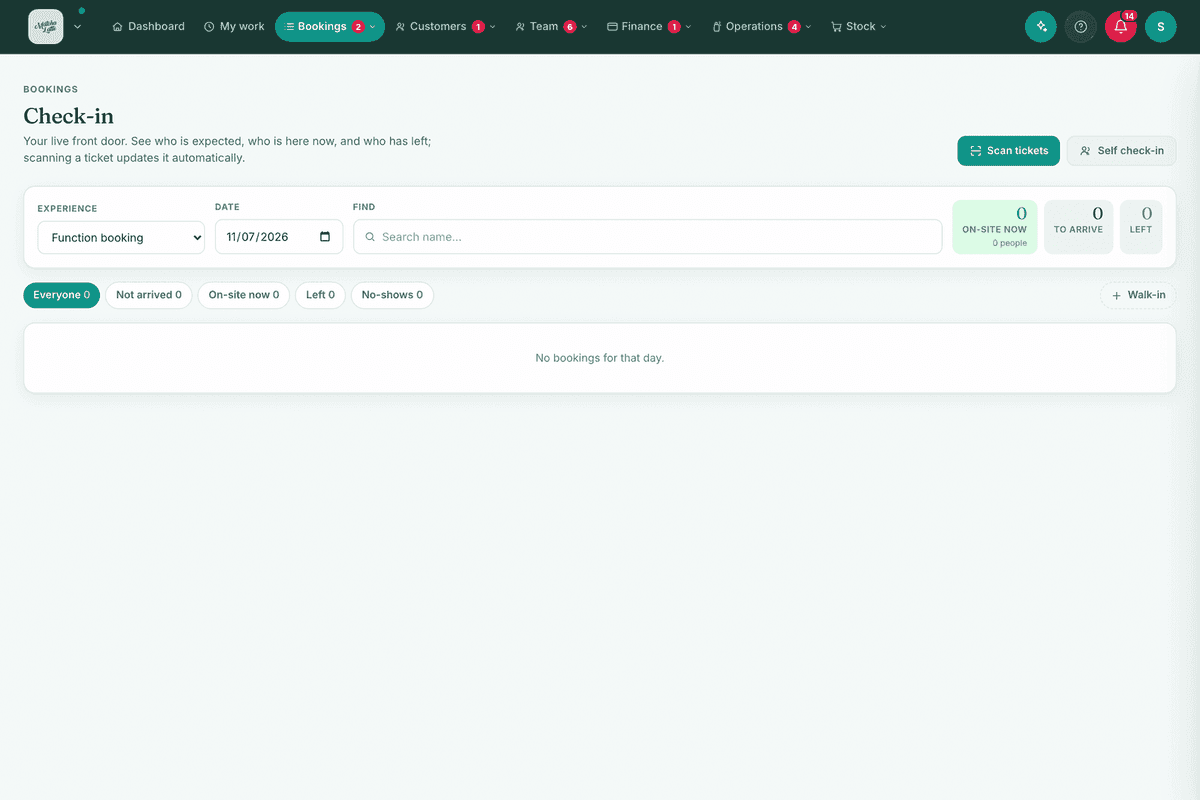
- Beginner (party venue): open Check-in for today's party and tap Arrive as guests come in; correct the headcount to the kids who actually showed.
- Real-world (event): put Check-in into Scan mode at the entrance and scan each QR ticket as people arrive.
- Advanced (gym): run the Kiosk on a wall tablet so members self-check-in to the 6am class, freeing staff for the floor.
E. Money rules, deposits and late cancellations
These settings decide when the rest of the money is taken, and what happens when a customer does not pay or cancels at the last minute. The deposit deadline and the late-cancel fee are off or free by default, and the balance is not charged automatically until you choose that, so nothing is ever taken or cancelled until you say so.
E1. The deposit deadline (auto-cancel an unpaid deposit)
When you approve a booking that needs a deposit, the pay link is emailed and the customer's spot is held. Without a deadline, an unpaid deposit holds that spot forever and only a person noticing frees it up.
Set a number of days and the booking releases itself instead.
- Where: the booking settings for your business. Off by default, and it stays off until you set a number.
- The clock starts when the pay link is emailed, not when you approve. If we could not send the request (no email address, no deposit set, Stripe not connected), the clock never starts and the booking is never cancelled. A customer is never punished for a message we failed to send.
- The deadline is fixed at that moment. Turning the setting on later cannot reach backwards and cancel a pile of older bookings.
- Nobody is cancelled without warning. One reminder goes out before the deadline with the exact date and time the spot will be released.
- Longest you can set: 90 days.
E2. Collecting the balance (when the rest of the money is taken)
The experience decides how much is paid up front. When the rest is taken is a whole-business rule, so it is set once and applies to every experience.
- Where: Settings → [your booking word] & pricing → Collecting the balance. The experience editor shows you what the current setting will do, under the deposit amount, so you do not have to remember it.
- Three choices:
- I'll charge it (one-click), the default. The card is saved at booking and nothing happens until you press the button in Payments.
- Auto, days before. Set a number of days and the saved card is charged that many days before the booking, without asking you first.
- Auto, on the day. The saved card is charged on the day itself.
- It only applies where money is actually outstanding, so an experience set to Pay in full or to Nothing is unaffected.
- The same number decides when the balance is chased. A customer is never emailed asking for money before the day it is owed.
- Exactly the remainder is taken, and nothing else. The amount is the booking's total less what has already been collected, worked out when the deposit lands and never re-derived from a price list afterwards. A late cancellation fee is a separate charge and is never added to it, and a cancelled booking is never charged.
What the customer is told, and when:
| When | What they get | What it says about the balance |
|---|---|---|
| The moment they book | "We're holding your spot", if payment is taken at checkout | The amount, and the day it will come off the card they are about to pay with |
| Money arrives | You're booked in, with the time, the place and a link to manage it | Nothing, this one is about the booking |
| Money arrives | Deposit receipt, a tax invoice | The same warning again, plus the itemised booking and what is still owing |
| You change the booking | "Your booking has been updated" | The new total, what is paid, what is left, and when it comes off |
| Before the booking | Reminder | The amount and the day, or Paid in full if it has already gone |
| The rest is taken | Balance receipt, a tax invoice | Both payments listed, and Amount due $0.00 |
Receipts are filed under Finance → Invoicing → Receipts, where you can open, print or re-send any of them.
E3. Cancellation cut-off and late fees
Each experience has a cut-off, in hours before the start. Inside it, a cancellation counts as late.
- Cut-off: 24 hours by default.
- What a late cancel costs: nothing, or they forfeit the deposit (the default), or a fee you set. The fee is the total including any deposit already paid, not on top of it.
- How the fee is collected: by default the customer is emailed a pay link. You can instead have the saved card charged automatically.
- Late reschedules follow the same policy by default. Otherwise somebody facing a fee could move the booking to next month and cancel that for free, leaving you with the empty chair and no fee. Businesses that do not charge for late cancels are unaffected, because for them a late move is still free.
- The customer is shown the policy before they confirm, so a fee is never a surprise.
Common mistakes (all of Bookings)
- Taking online bookings before setting up Experiences, there's nothing to book until at least one experience is Live.
- An experience with no spaces or equipment attached, availability can't be worked out; attach the staff/space it uses.
- Marking an experience Live while still drafting it, untick Live until it's ready.
- Choosing "ticket" delivery but "staff" check-in (or vice-versa), that's fine and common, but make sure the door method matches how you actually run it.
- Editing a booking expecting the customer to know, reschedule/cancel notify them, but manual field edits may not.
- Switching a space or an experience off to close one day. That closes it for every future date, and nothing reminds you to switch it back on, so it quietly stops earning. Use Calendar → Block out for a single date, a run of dates, or part of a day.
- Blocking out time and expecting it to cancel bookings. It stops new ones. Anything already booked in that window is still going ahead, and the app tells you how many when you block. Cancel those yourself if that is what you meant.
Troubleshooting
| Problem | Fix |
|---|---|
| Customers can't book online | Check the experience is Live, has spaces or equipment attached, and has open availability (use the Availability preview). Then check the date itself: a closure (Roster → Closures) or blocked-out time (Calendar → Block out) withholds it, and neither shows in the Availability preview, which reads your setup only. |
| No times show when rescheduling | The experience has no open slots that day, pick another date, or check the space or staff hours/roster. Also check whether that date is blocked out on the Calendar. |
| A room is not being offered on one date | Something is blocking it: look at that date on the Calendar, where blocked-out time shows a "Not taking new bookings" tag with an Unblock button. |
| I need to stop bookings for one room on one day | Calendar → Block out, choose the date and pick that space. The other rooms carry on selling, and your team can still book it at the counter. |
| Someone is off sick and their day is booked | Two steps. Stop new bookings: Time & pay → Roster & timesheets, mark them off for the day (or approve their leave). Then move the bookings they already have: open each one and use Reschedule, where Who with lets you keep the same person on another day, or hand the client to a colleague. Marking someone off never moves or cancels their bookings. |
| A booking changed to a different person by itself | It no longer does. Reschedule keeps whoever the booking is with unless you choose someone else under Who with, and the customer's email says who they will be with when it changes. |
| Check-in shows no one | Confirm you've selected the right experience (try All experiences) and the date; clear the search box. A cancelled booking is deliberately not listed, so check the booking itself if you expected someone. If the door genuinely cannot read your bookings it says so in a banner, it will never show an empty list instead. |
| The scanner won't read tickets | Allow camera access and use a device with a working rear camera; ensure the experience uses ticket delivery. If it still won't play, choose Won't scan? Type the reference and enter the reference from their ticket. |
| Self check-in says nobody is booked | The kiosk runs one session at a time. Tap Staff on that screen to see which one it is set to, and switch it if it is the wrong one. |
| A booking is missing from Upcoming | It may be a request (Pending approval tab), cancelled/declined, or in the past (Past tab). To find a cancelled one, open Past and tick Show cancelled. |
| A tab's number looks bigger than its list | It should never be. Every tab counts exactly what it lists, and cancellations are counted in neither until you ask for them under Past → Show cancelled. If the two ever disagree, tell us. |
| Headcount stepper isn't shown | It only appears for on-site bookings without a per-guest list. |
Error messages
The Bookings screens use inline toasts (e.g. "Booking created", "Booking cancelled, the customer has been notified.", "Moved to …"). Action failures return a short message in the same toast (e.g. a reschedule clash), read it and adjust. Camera-unavailable on Scan shows a graceful fallback explaining the device has no usable camera.
Related: Calendar · Payments · Invitations & day plan · Customers