
Module · Forms & workflows
Where to find it in the app
- Use it: Operations → Forms
- Turn it on/off: your business name (top-left) → Settings → Modules → Operations → Forms
Plan: Business · Module group: Operations · Navigation:
Operations → Forms
1. Overview
Purpose. Build your own forms, incident reports, maintenance requests, feedback, checklists, and track every submission through a workflow of statuses you define. Nothing is fixed: you choose the fields, the wording and the stages each submission moves through.
2. When to use it
- To capture structured information your team submits repeatedly.
- To manage what happens after submission (triage → in progress → done).
3. Required permissions
- View / submit forms (
forms.view), see and fill in forms. - Build forms & manage submissions (
forms.manage), create/edit forms and move submissions through their workflow.
4. Navigation path
Operations → Forms
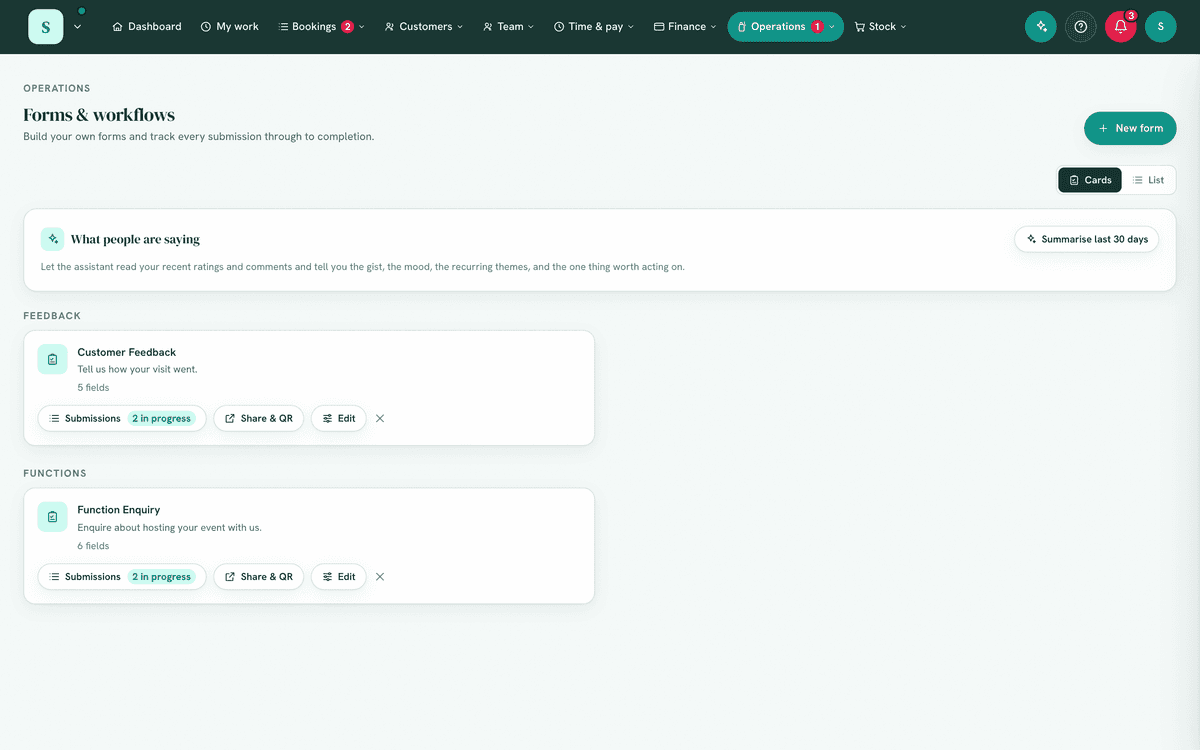
5. What you'll see
- A list of your forms. Anyone with View / submit forms sees "Fill in the forms your team uses"; anyone with Build forms & manage submissions sees the full Forms & workflows builder with Submissions for each form. It follows the permission, not the job title, so if you grant that permission to a supervisor or to a role you made yourself, they get the builder.
- A builder to create/edit a form.
- A Submissions panel to track entries by status.
6. Turning it on
Settings → Modules → Operations & compliance → Forms.
7. Step-by-step tasks
7a. Create a form
Select New form. Start from a template (so you never face a blank page), from scratch, templates are just editable seeds, or choose Describe it, let AI build it: describe the form in plain English and the AI drafts the title, fields and workflow for you to review and edit before saving. AI drafting uses your business's shared AI allowance.
Set the title (e.g. Incident report), an optional description (guidance shown above the form) and a category.
Add fields. Field types available:
Type Use Short text A single line (name, reference) Long text A paragraph (description, notes) Number A numeric value Email An email address Phone A phone number Date A calendar date Date with availability A calendar that shows your open and closed days, see 7a4 Time A time of day Date & time A date and time together Dropdown Pick one from a list Choice Pick one (shown as buttons) Checkboxes Pick any that apply Yes / No A simple toggle Rating A star rating (set the max) File upload Attach a photo, PDF or document Signature Sign on screen with a finger or mouse Section heading A heading to group fields File upload lets a respondent attach a photo, PDF or document (handy for a damaged-item photo or a supplier quote); the file is kept in private storage and only opened through a signed, expiring link. Signature captures a drawn signature on the screen, so an incident report or a waiver can be signed off there and then.
For each field set its label, optional help text and placeholder, whether it's required, and (for list types) its options. You can also add conditional logic, show a field only when an earlier answer matches (e.g. show Describe the injury only when Injury? is Yes).
Define the workflow statuses, the lanes a submission moves through. The default is New → In progress → Done; the first status is where new submissions start. Rename/add/remove to suit.
Set the submit button label, a success message, and optionally Email owners & managers on each new submission.
Save.
7a2. Automations (optional)
Each form can act on its own once a submission arrives. Every one of these is optional:
- Auto-assign new submissions to a chosen team member.
- Acknowledge the submitter by email, sends a short branded "thanks, we've got it" whenever the submission includes an email address. Needs email connected.
- Announce to the team when a submission reaches a chosen status.
- Escalate if not resolved in time, pick everyone who manages forms or one person and a number of hours; if a submission is still open (not in the last lane) after that long, they're emailed once. Great for incident reports that mustn't sit.
7a3. Share a form with customers (public forms)
Forms don't have to be internal. Turn on Public link and the form gets its
own address at /f/<slug> that anyone can fill in with no login, so it's ideal
for feedback, enquiries or intake.
- In the builder, under Share with customers, switch on Public link.
- Use the Share panel to copy the link, Download QR (a QR image to put on a wall, counter sign or receipt), or Print poster (a ready-made printable poster with your business name, the form title and the QR).
- For tighter control, turn on Only via a personal link: the plain link stops accepting entries and only one-use links you send (for example after a booking) will work. Best for verified, low-spam responses.
- Auto-send a link after a booking emails each booking that has a customer email one personal link, a set number of hours after the booking ends.
When a public form has a Rating field you get two extra tools:
- Alert on a low rating, set the rating (or lower) that emails the form managers, so an unhappy response reaches you straight away.
- Review Booster, invite every submitter to leave a Google review. Add your Google review link and a threshold; happier customers (at or above it) get an upbeat nudge, lower ratings get a "let us make it right" message and trigger the manager alert. The link is shown to everyone, since hiding it from unhappy customers would breach Google's review policy.
7a4. The "Date with availability" field
An ordinary Date field accepts any date, including days you are shut or already full, and you find out when you read the submission. This field shows the person a real calendar of your days before they pick one.
Each day is labelled: open (a small dot), closed that day, or, when the field is linked to one of your offerings, no times bookable online. In the field's settings, Show availability for picks what the calendar reflects: your whole business (trading hours and closure dates) or one specific offering (its live booking availability).
Closed days can still be picked, on purpose. Someone enquiring about exclusive hire or a private function often wants exactly the day you are shut, because the venue is empty. The calendar tells them you are closed and lets them ask, and their submission shows you the date they chose. If you want the opposite, for example a cake order that needs a trading day, switch on Only allow days that are open and the calendar makes non-open days unpickable. The same rule is enforced when the form is submitted, not just in the picker.
Past dates can never be picked or submitted, whichever way the switch is set.
7a5. Offer a form on your booking page
A form can appear as a card on your public booking page, under your offerings. This is how you take enquiries for things your booking flow cannot book: an after hours private hire, a custom cake, a wholesale order, a school visit, a quote request.
- In the builder, under Share with customers, switch on Public link.
- Switch on Show on your booking page.
- Give the card a heading and an optional one-line pitch, in your own words. That is exactly what your customers see.
Form is live is the master switch. It has to be on for any of this to work. Turning it off closes the public page, the QR code and the booking-page card together, not just your team's copy, so it is the one to reach for when you want a form completely off and the wrong one to reach for when you only want it hidden from staff.
The card links to the form, submissions land in Forms like any other, and Email the form managers on each new submission tells you the moment one arrives (it goes to everyone whose role can Build forms & manage submissions, so a custom role you gave that permission to hears about it too). Pair it with the automations: acknowledge the submitter so they get an instant "we've got it", and escalate so an enquiry nobody answered gets chased, an unanswered enquiry being a lost sale.
A business with nothing bookable online at all can still run its whole shopfront this way: an empty catalogue plus an enquiry card is a working booking page.
Cards do not show for forms set to Only via a personal link, because their plain address refuses entries, and a button that leads to a refusal is worse than no button.
7b. Fill in a form (staff)
- Open
Operations → Formsand choose the form. - Complete the fields and submit. You'll see the success message.
7c. Manage submissions
- As a manager, open a form's Submissions.
- Read each entry and move it through your statuses (e.g. New → In progress → Done) as you action it.
- Need a hand? On a submission, Suggest triage asks the AI to propose a status and assignee with a short reason, you decide whether to apply it, and Draft reply writes a reply email to the submitter for you to edit before sending. Both are manager-only and use your business's shared AI allowance.
8. Examples
- Beginner (any): use the Feedback template as-is and share it with the team.
- Real-world (venue): an Incident report form with date, description, a yes/no "injury?", and a severity rating; submissions flow New → Investigating → Closed, with the form managers emailed on each one.
- Advanced (facilities): a Maintenance request with a category dropdown and photo notes; statuses Logged → Quoted → Scheduled → Fixed so nothing is lost.
9. Reports & exports
Each form's Submissions panel is the record, grouped by your workflow statuses. New submissions can notify the form managers by email (everyone whose role can Build forms & manage submissions).
For feedback-style forms, Summarise last 30 days produces an AI digest of recent submissions, overall sentiment, recurring themes and suggested actions, so you don't have to read every entry to spot a pattern. It uses your business's shared AI allowance.
10. Common mistakes
- No "required" on key fields, important details get left blank; mark them required.
- Too many statuses, keep the workflow short and meaningful.
- Editing a live form's fields mid-stream, existing submissions keep the answers they were given; plan field changes carefully.
11. Troubleshooting
| Problem | Fix |
|---|---|
| Staff can't find a form | They need View / submit forms, and the module must be on. |
| No email on new submissions | Turn on Email the form managers on each new submission in the builder. It emails everyone whose role can Build forms & manage submissions. |
| Can't change a submission's status | That needs Build forms & manage submissions. |
| The card isn't on my booking page | The form needs Form is live on, Public link on, Show on your booking page on, and it must not be set to Only via a personal link. The Forms tool must be switched on, and the card sits under your offerings, so scroll down. |
| I switched a form off and my public link stopped working | That is what Form is live does. It is the master switch for the whole form, not just for your team: off closes the public page, the QR code and any booking-page card as well. To stop your team seeing a form while leaving it open to customers, turn on Public link instead, which takes it off their Forms page and My Work on its own. |
| The availability calendar shows every day as open | The calendar follows your trading hours (Settings → General) and your closure dates. If you have never set trading hours, every day reads as open, set them and the closed days appear. |
| Someone picked a day we're closed | That is allowed by design on an enquiry, the calendar told them you were closed and they asked anyway, which for private hire is often the point. If this field should refuse closed days, open it in the builder and switch on Only allow days that are open. |
12. Error messages
Saving a form and submitting an entry both confirm inline ("Form saved", plus your custom success message). Required-field validation prevents an incomplete submission and highlights what's missing.
Related: Safety & cleaning · Documents